Saturday 25 April 2009

A Cakestand


Just because I did buy it. I know I am supposed to be crafting my own stuff, but this was far too pretty not to buy.

Tuesday 14 April 2009

Pullman Bread Tin


Well, Mr Postie bought me my Pullman Tin today. I have to say that so far I am impressed with the depth of it but the width of the slices is rather thin, bit like melba toast. Ho Hum - I will give it a go anyway. Others claim that a pullman tin gives a perfect square loaf.


I know breadmaking isn't really crafting (well to some maybe) but like lots of people I have a breadmaker and I have found that by using the dough programme and then letting the dough rise for a few hours, I can get wonderful bread that is light & fluffy. The problem I had was that no matter how much I tried to get it like a bloomer, it still resembled a cowpat and my littlelies are a bit funny with bread - it must be square.
Hence this tin. I have put the dough on and will bake later and give you another pic to see how it is.

Sunday 12 April 2009

Almost forgot my Easter Cakes


Oh I can't wait until after dinner!!

Easter Bonnet (a very quick one)


Goodness I am so behind with this sort of stuff this year. First of all can I wish anyone who is reading this a Happy Easter and I hope you have a lovely day with your families!


Off to church in a mo', so not much time. After that we have a childrens disco at our club, with..... you guessed it - an Easter Bonnet competition. This is a very fast one. It's a bit late for this year, but I used craft wire and tissue paper to make flowers. Cut two 6 x 6 squares and cut the corners off, scrunch the middle twist craft wire, repeat and sort of fluff the flowers out. The hat was from my fave shop £1 shop and the chick was from an egg the children were given.
We also have friends & family coming for a roast, so leg of lamb, roasties and all of the trimmings. Yum.

Saturday 11 April 2009

Easy Wedding Invite


I just found this whilst looking for something amongst my stash. I made it as a sample for a friends wedding but she went for something else which was completely different. However this remains one of my favourites for wedding/party invites. Using some nice A4 patterned paper, you can make a really simple idea look very elegant, I think. Plain A4 card with script writing on and a nice ribbon really makes this special. You simply cut a 3 sided envelope, us a bit of DS tape on the back and when it's folded & glued, you can either cut a V shape using scissors, or before you fold do a curve or something. Whatever you want really. To make a curve on this type of card I have used a saucer, pint glass or something big & round. Just cut straight round as it's hard, you can do this without pencilling in.

Easter Bunny Soup


Ok, I got this idea from MSE, (thanks girls). Easter Bunny Soup. I paid £2.25 for 15 cello cones from Ebay. Then I went into Lidls and paid £1 each for strawberry/banana milk shake mix. I put 2 tbsps of each into the cone and filled it up with some Marshmallows £1. I then added some curling ribbon and a tag with instructions and a Happy Easter message. I have managed to make 15 for £5.25, if you add the money for the pastel card and curling ribbon I suppose that would be another £1 so not a bad deal really and they look fabulous.

Friday 10 April 2009

Making Dragonflies quite easily


I have decided to make a dragonfly. I have done this previously with the rainbow metallic card but have run out of that, so I thought I would show you how to do one using silver glittered card for the wings.


Get silver craft wire, thread beads, use fine ended scissors/pliers to turn the ends of the wire into a small loop. Then cut a pair of wings from anything you like. I have used silver card, but you can use acetate, or anything that's shiny really even foil. Just fold in half and cut the wings out so that you have pair that matches.
They are tiny, and only will cover a 3 inch square but I reckon if you make two and put them to a flower or plant they will look fab on cards. I know I have used green chalk on a white card before now.
I started this project wanting to make butterflies, but ended up with dragonflies.

Tuesday 7 April 2009

Pretty Favour type thingies for a party table


I have just made 30 of these for a party table. Once again, soooo cheap to do. I got eggs from the pound shop (25 per bag), unwrapped them to find they were dark, milk & white chocolate, so rather yum and look fab in cello. Put 4 in each favour, cut a piece of cello from florist, who sold me 3m for £1.50 so cut a 11'' strip and it works out that you can get 3 squares from that.

I used curling ribbon, tip here is to use two colours. I then attached a small label with a stapler and they look fab. The picture doesn't really do them justice as you can't see the silver etc. They cost roughly about 15p each to make. You can use these for so many things, weddings, kids party's etc. I am decorating the hall for this party and will be doing a long post I expect about helium balloons etc as I am going to have a go at blowing them up myself. Yiiiiiiiiiiiiiiiiiiiiikkkkes!! Also I have done something with some cheap table rolls from ebay including runners.

Monday 6 April 2009

A post without pics, as I am trying to work out what to do with the bed. Sadly, the joists in the bedroom were buggered so hubs is putting new joists in. I hate this sort of work, it's all good but you can't see a result in about 2 seconds.

I am also enormously fed up with trying to get the 'varnish' off of things. It's elbow/muscle making work and although I am using an electric sander, I am getting fed up. I think it's my hubs viewpoint that everything has to be sanded down about 500 times. Arghhhhhhhh.

I know he is right, but 5 lots of primer, I am fed up. What he says about this is that if it has a knock etc, it will not matter. At this point I don't actually care. I would rather have bought a chest of drawers in white.

A 40th Card for a good Mate!


I made this using an A4 card, then put a pale lemon piece of A4 (trimmed) some sticky ribbon and the new prima flowers I recieved. Well I am going to have a moan and wish I hadn't left such good feedback on these. They are very tatty and only a few were actually of any use.


However, with a couple of lemon brads and the lettering cut out in the time old fashioned way of using a craft knife & board, I think it's groovy enough. The letters were cut out of a piece of 12x12 that I was meant to use for scrapping, but hey, she is a good mate. To make the letters I used wordart and make them go backwards by turning the square around on itself. Then when you print on the back they come out the right way. I really really need one of them machines as it's quite time consuming. I think they are called robocraft.

Saturday 4 April 2009

Saturday Night - Wine included.


Well, it's Saturday night and I am ecstatic that I have 2 whole weeks off work. Yayyyyy and double yay to that. I can't help thinking how much crafting and stuff I can do in two whole weeks.

I intend to start really building up a store of cards. Using my old stuff of course as this blog is about money saving after all.

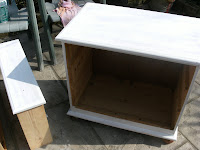
I thought I would show the dreadful pine chest once more whilst it was being primed!!! I was going to leave the feet orange but have decided against it. They looked awful.
Today I recieved an envelope full of primas from ebay. They were only a £1 so expect some cards with flowers on as I just have to use them.
Back to the drawers. You must sand off all of the dreadful varnish, down to the bare wood I 'm afraid, otherwise they will look like crap and your paint will not stay on - I kid you not and you will be ever so fed up. The companies that sell 'hideous orange pine, must get loads of emails/letters asking how the devil do you get it off?
Use a sander or very very coarse sandpaper for the first dibs and then onto a finer one etc. For each coat of undercoat let dry then sand rough bits again. Another tip for painting furniture with flat bits on is to make sure each stroke of the brush goes from one end of a flat bit to the other, if you start in the middle you will notice it when it dries.

Wednesday 1 April 2009

A Christening Card


I was a little lost for ideas on this one as I make cards very rarely. I love the 3D effect on cards, so I decided to fashion a bible using a bit of thick foamboard. I wrapped it in some Easter Egg foil (yes, I am eating eggs already) to creat the look of gold leaf on the edges of the 'pages'. Then I used a bit of old pearlescent card to make the cover, stuck a peel on cross on it. To make the bookmark, I used a tiny piece of ribbon with the ends cut nicely. It still looked plain so some polka dot sticky ribbon down the side, put the words on silver card with blue eyelets and you have a pretty christening card.